iexe's pixtures....
hala..panghikay.....


oist...cute ba?... green na green.....hehehe


kurimaw na pixture ni indai liezel...hikayi nya lang please.....hehehehe


Installation Process

How to install Ubuntu : The Ubuntu Installation Guide

The Ubuntu installation guide: last updated April 2009

how to install UbuntuWhen it comes to installing Ubuntu, there are so many useful snippets of information on blogs and guides all over the internet. If you Google “How to install Ubuntu”, you’ll see what I mean.

For an Ubuntu beginner or curious Windows intermediate user however, there’s no single, simple source of information when it comes to trying out your first Ubuntu installation. One thing I have noticed is that there’s a lot of technical jargon and sometimes unnecessary terminal commands in lengthy forum posts, but no simple “how to” guides, which I think might put some people off! A shame, when you think about how easy Ubuntu is to install, use and tweak to look really cool!

This post will talk you through your first Ubuntu installation, hopefully teaching you everything you need to know to give Ubuntu a try without breaking or removing your existing Windows installation. The end result will be a “vanilla” Ubuntu Installation running simultaneously with your Windows installation using either the GRUB bootloader, or WUBI, depending on how far you’d like to go on your first Ubuntu experience.

Ubuntu desktop - running Compiz

I hope my guide makes installing Ubuntu an enjoyable, simple experience. By the end of the guide you should have a dual boot Windows / Ubuntu machine that happily plays music, video, and acts as a perfectly usable home office computer with Openoffice 3.0. For the really adventurous you could even run Windows XP inside Virtualbox, which is linked to later on in the guide. The Ubuntu OS is unique and seriously cool, so, enjoy the trip.

The all new Ubuntu login screen

If you’re planning on installing the latest version of Ubuntu (Jaunty Jackalope 9.04) you can install Ubuntu straight from the CD inside Windows or from a USB stick and the install process can takes care of formatting your hard drive partition for you. You might not yet have a spare partition to do this, so I’ve covered shrinking your existing Windows partition to make space for Ubuntu here.

How to install Ubuntu from a CD

1) Download the Ubuntu ISO from http://www.ubuntu.com/getubuntu/download and save to your desktop

2) Burn the ISO image to a blank CD using Roxio CD creator or similar:
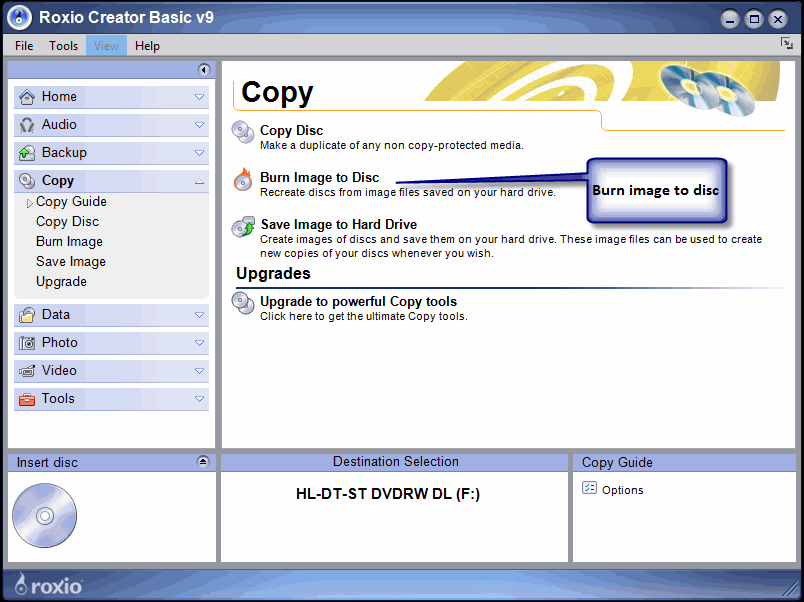
burn a disc image with roxio

3) Run the CD from “My Computer” – the CD should ask permission to run at which point you’ll see this option screen:
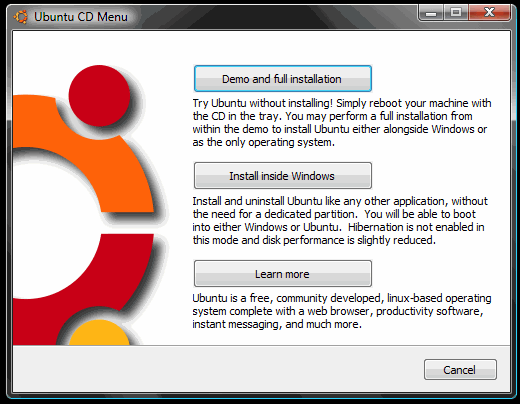
4) If you’d like to install Ubuntu using Wubi, select “install inside Windows” and follow the instructions. Installing with WUBI is ideal for a first taste of Ubuntu as you can remove from add/remove programs in Windows later on. This install process is really easy but you don’t get the same performance as if Ubuntu had a separate partition running on its EXT3 file system. The following screens are all based on the Wubi installer process, so you can follow the rest of the instructions below.

If you’d like to install Ubuntu separately to Windows, then skip to point 7) below.

Here’s what you see next:

Wubi installer

If you’ve got the space on your hard drive, go for 30gb or more for the installation size.

5) Now configure your installation using the simple settings options. You can specify the location of the Ubuntu installation on your Windows partition, the size of the Ubuntu installation, the Ubuntu flavour (Ubuntu, Kubuntu, Xubuntu, etc), your preferred language, and a username and password for the Ubuntu system.

When you click install, you’ll see this screen:
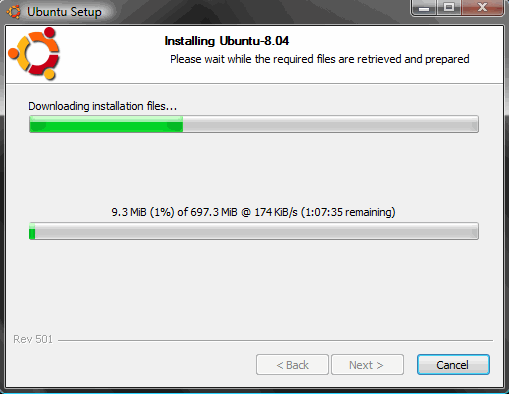
As soon as the files have finished downloading, you’ll see this:

Time to reboot Wubi installer

6) That’s it! Click reboot now, and select “Ubuntu” on the startup screen. You now have a fully functional dual boot Windows / Ubuntu machine.

If you’d like to install Ubuntu separately to Windows, then follow these instructions:

7) Click “Demo and full installation” and your computer will restart and boot into Ubuntu.

It’s worth saying at this point that you’re about to install Ubuntu on an entirely separate drive partition. That means, you need to make sure you have enough space on your computers hard drive to accomodate the new setup. Keir Thomas found that a partition less than 4gb would lead Ubuntu to crash during install in his first look at Ubuntu 9.04 over at Lifehacker.

Here’s a guide on how to resize or shrink your Windows Vista partition. Follow those instructions before you reboot into the live version of Ubuntu and you’ll have a really easy time during the following steps. Maybe you’d like to install from a USB? Let’s have a quick look at the process of installing from a USB before we continue:

Here’s how to install Ubuntu on a USB drive from Windows Vista:

8) Format your USB stick with a FAT32 partition from Windows. You can get to the format dialogue by opening My Computer and right mouse clicking the removable drive icon. Click “Format” and follow the settings in the image below. You need a minimum 2gb USB stick.

format your USB drive in Windows Vista

9) Download UnetBootin. UNetbootin allows for the installation of various Linux/Ubuntu distributions to a partition or USB drive, so it’s no different from a standard install, only it doesn’t need a CD. The coolest thing about the application is that it’s a “portable” app. You don’t need to install it into Windows meaning UNetbootin will run on your Windows PC without “admin” privileges.

using unetbootin to install the new ubuntu jaunty jackalope

The new version of Ubuntu isn’t in the Distribution list supplied with UNetbootin yet, so use the downloaded Ubuntu ISO from earlier on. Add the ISO using the “Diskimage”, make sure your USB drive is selected below and click OK.

The ISO transfers to the USB pretty quickly, so soon after you click OK you’ll see this screen:

unetbootin complete

10) That’s it – when the installation process is complete, restart your computer and make sure it’s set up to boot from USB. On my HP Laptop, pressing F9 on the boot screen shows a boot order menu. Selecting “USB Hard Drive” follows a black screen, an Ubuntu logo, and finally, your new Ubuntu desktop appears.

Completing your Ubuntu installation, step by step

Installing Ubuntu is so easy that it requires very little effort past this point. If you’ve managed to repartition your hard drive and restart your computer you’ll sail through the next few steps:

11) Click “install” on the live desktop (top left)

vanilla Ubuntu desktop

12) Choose your language in the welcome screen

welcome1

13) Choose your location

Choose location

14) Choose your keyboard layout

welcome31

15) Set up your disk partition. This is probably the most “technical” part of the installation. When I shrunk my Windows Vista drive volume, I never formatted the new partition, which means the “use the largest continuous free space” option works nicely:

Set up a disk partition for Ubuntu

16) Choose your username and password:

Choose your Ubuntu Password

17) Migrate your Windows documents and settings

Migrate your Windows settings

18) You’re now ready to install your new Ubuntu installation

Ready to install

19) When the installation has finished, restart your computer (you’ll be instructed to remove your cd rom or USB drive). You’re now ready to begin using Ubuntu!

Installation Process of open Source OS
Installation Process of Redhat Linux OS

Step 1
The GUI (Graphical User Interface) based installation wizard of Red Hat Linux can be navigated either with the mouse or via the Enter and Tab keys of the keyboard. Launch the installation program via the CD-ROM installer. Make sure that the first boot device defined in the BIOS setup is the CD drive.


Step 2


To verify if the CD drive is the first boot device, press the DEL or F1 key during the boot up process to enter the BIOS setup menu. Make sure to save the changes before exiting. The machine will reboot automatically.

Step 3

Make sure that you have a copy of the driver diskette for your hardware. This is a safety precaution in case some devices are not supported by the installation process. When prompted for the driver, simply insert the driver diskette in the corresponding drive.

Step 4

Upon reboot of the machine, the boot installation program will be displayed. The installation process automatically initiates when no user action is detected within a minute. An alternative is to press the Enter key to boot.

Step 5

The kernel (Linux) will proceed to detect all hardware devices attached to the system. Once all the hardware has been detected correctly, proceed to the next phase. If not, restart the installation procedure by selecting the Expert Mode. This mode eliminates hardware probing allowing the user to manually define and load all the necessary hardware drivers.

Step 6

The installation method will then be asked from the user. Select the CD-ROM option to load the system files from the optical media and choose the OK option.

Step 7

When prompted by the program, place the Red Hat Linux CD into the drive replacing the boot loader.

Step 8

The user will then be asked for the language to be used during the installation process. Using the mouse device, click on the appropriate language from the list and click on the Next button.

Step 9

The screen allows the user to define the keyboard model and layout as well as to enable dead keys. Click the Next button after choosing the correct settings.

Step 10

The mouse is the next device to be configured. The screen provides the user with an option to emulate a 3-button mouse. Choose the Next option when finished configuring the hardware.

Step 11

The Red Hat Linux Welcome Screen will be displayed to the user. Click on the Next button to proceed. Choose the Full Installation option from the succeeding screen and press the Next button.

Step 12

The next screen allows the user to decide on the type of partitioning method to be used. Usually the Automatic partition option is chosen. Click Next to continue.

Step 13

You can now set the Time Zone relative to your location as well as the UTC (Universal Coordinated Time) offset. Click Next to move to the next portion.

Step 14

The next screen is for the Account Configuration. The root password, account name, password, and full name can be declared in this portion. Click the Next button.

Installation Process of Window Vista


Installation Begins

Introduction


After getting the OEM version of Windows Vista in early yesterday, several readers in our forums asked for information on the installation process of the new OS. Never one to disappoint, I took some pictures of the various screens and menus that you'll see if you choose to upgrade to Vista.

The screen shots are mostly self explanatory, but where details are needed I will explain!


A Fresh Installation Begins


-The first screen in our Vista installation process after booting off of the DVD, you can select the installation language and region settings right from the beginning.


-Right away you'll be asked for that all important license key and with the check box below it, you're actually setting an option that will be very important later. When "Auto activate" is checked, Windows Vista will only give you three days to activate; but if you uncheck this box, Vista said I had 30 days to play with the system before activation was required.


-Since this was a blank drive, upgrade options were not allowed, though even if you wanted to upgrade you are forced to start the process from the current Windows OS.


-The actual file copying, expanding and installation is pretty quick; much more so than Windows XP.

-After you set the default user and password, security settings, and time zones you are ready to enter the OS for the first time.


-But not until you let Vista run a performance test on your hardware. This test will generate a performance number for your system which can be used to judge application compatibility with future Vista-ready titles. More on this later.


-The opening screen on Vista is set to answer most of the questions you might have moving from a Window XP experience.


Installation Process


Installation Process of Window XP

1. Insert the Windows Xp CD into your computer and restart your computer.


2. If prompted to start from the CD, press SPACEBAR. If you miss the prompt (it only appears for a few seconds), restart your computer to try again.


3.Windows XP Setup begins. During this portion of setup, your mouse will not work, so you must use the keyboard. On the Welcome to Setup page, press ENTER.


4.On the Windows XP Licensing Agreement page,


read the licensing agreement. Press the PAGE DOWN key to scroll to the bottom of the agreement. Then press F8.


5.This page enables you to select the hard disk drive on which Windows XP will be installed. Once you complete this step, all data on your hard disk drive will be removed and cannot be recovered. It is extremely important that you have a recent backup copy of your files before continuing. When you have a backup copy, press D, and then press L when prompted. This deletes your existing data.

6.Press ENTER to select Unpartitioned space, which appears by default.


7.Press ENTER again to select Format the partition using the NTFS file system, which appears by default.


8.Windows XP erases your hard disk drive using a process called formatting and then copies the setup files. You can leave your computer and return in 20 to 30 minutes.


Part 2: Continue the installation

9.Windows XP restarts and then continues with the installation process. From this point forward, you can use your mouse. Eventually, the Regional and Language Options page appears. Click Next to accept the default settings. If you are multilingual or prefer a language other than English, you can change language settings after setup is complete.


10.On the Personalize Your Software page, type your name and your organization name. Some programs use this information to automatically fill in your name when required. Then, click Next.


11.On the Your Product Key page, type your product key as it appears on your Windows XP CD case. The product key is unique for every Windows XP installation. Then, click Next.


12.On the Computer Name and Administrator Password page, in the Computer name box, type a name that uniquely identifies your computer in your house, such as FAMILYROOM or TOMS. You cannot use spaces or punctuation. If you connect your computer to a network, you will use this computer name to find shared files and printers. Type a strong password that you can remember in the Administrator password box, and then retype it in the Confirm password box. Write the password down and store it in a secure place. Click Next.


13.On the Date and Time Settings page, set your computer’s clock. Then, click the Time Zone down arrow, and select your time zone. Click Next.


14.Windows XP will spend about a minute configuring your computer. On the Networking Settings page, click Next.


15. On the Workgroup or Computer Domain page, click Next.


Part 3: Complete the installation

16.Windows XP will spend 20 or 30 minutes configuring your computer and will automatically restart when finished. When the Display Settings dialog appears, click OK.


17.When the Monitor Settings dialog box appears, click OK.


18.The final stage of setup begins. On the Welcome to Microsoft Windows page, click Next.


19. On the Help protect your PC page, click Help protect my PC by turning on Automatic Updates now. Then, click Next.


20.Windows XP will then check if you are connected to the Internet:


• If you are connected to the Internet, select the choice that describes your network connection on the Will this computer connect to the Internet directly, or through a network? page. If you’re not sure, accept the default selection, and click Next.


• If you use dial-up Internet access, or if Windows XP cannot connect to the Internet, you can connect to the Internet after setup is complete. On the How will this computer connect to the Internet? page, click Skip.


21. Windows XP Setup displays the Ready to activate Windows? page. If you are connected to the Internet, click Yes, and then click Next. If you are not yet connected to the Internet, click No, click Next, and then skip to step 24. After setup is complete, Windows XP will automatically remind you to activate and register your copy of Windows XP.


22.On the Ready to register with Microsoft? page, click Yes, and then click Next.


23.On the Collecting Registration Information page, complete the form. Then, click Next.


24.On the Who will use this computer? page, type the name of each person who will use the computer. You can use first names only, nicknames, or full names. Then click Next. To add users after setup is complete or to specify a password to keep your account private, read Create and customize user accounts.


25.On the Thank you! page, click Finish.


(0) Resource allocation graph

a set of vertices V and a set of edges E.


  • V is partitioned into to two types:

  1. P= {P1,P2,...,Pn}, the set consisting of all the processes in the system.
  2. R={R1,R2,...,Rm}, the set consisting of all resource types in the system.

-request edge-directed edge P1 [] Rj

-assignment edge-directed edge Rj[]Pi


_Process


_Resource typeb with 4 instances


_Pi requests instance of Rj


_Pi is holding an instance of Rj

Q: How would you know if there's a deadlock based on the Resource Allocation Graph?

Basic Facts:
  • if graph contains no cycle => no deadlock
  • if graph contains a cycle,

---if only one instance per resource type, then deadlock

---if several instances per resource type, possibility of deadlock.


RESOURCE ALLOCATION GRAPH


(0)A Resource Allocation Graph

_This RAG shows a cycle of 3 processes and 4 resource types.


(0) Resource Allocation Graph with deadlock.

-First P1 have a request to R1.The instance of R1 has been hold by P2. This process then sends request to R3 , and P3 is holding its instance. When P3 sends request to R2, which consists of 2 instances. One instance holds by P2 while the other one holds by P1. There exist the deadlock when the instances of two different resource type are been holds by one Process(P2) at the same time.


(0) Resource allocation graph with a cycle but no deadlock

- The graph contains a cycle. Each processes holds an instance of the resource. First, P1 sends request to R1, which contains 2 instances. P2 and P3 are holding these instances . Then, P3 sends request to R2 which also contains 2 instances and each of these are holds by P4 and P1.


(0)Resource allocation graph for deadlock Avoidance

_for deadlock avoidance, it will ensure that a system will never enter an unsafe state. P1 holds the resource type (R1) and P1 then sends request to R2. P2 at the same time sends request to two different resource type.


(0) Unsafe State in a Resource Allocation Graph

_if the system is in unsafe state, there's a possibility of deadlock.